Tuesday, June 19, 2012

This Week in the Garden


After spending most of the day Saturday in the gardens cutting back, cleaning up a little and weeding {primarily the veg garden} a lot, I took a little stroll around the yard Sunday snapping some pics.


It's near the end of June.  Summer officially starts tomorrow, and my beds are still looking good!  I asked Hubby just the other day when was the last time the perennial garden looked this good.  Neither of us could even remember!


Gaillardia grandiflora "Fanfare", or Blanketflower grows quite prolifically in my garden.  And it self-seeds all over the place!  So much so that early in the season I yank out a lot when weeding and still get tons of plants popping up.  I don't mind this pretty flower's little invasions.  Isn't it so unique with it's trumpet-like petals?  Hence, the "Fanfare" name.


The Butterfly Flower is in full bloom; although, I haven't noticed any butterflies flitting around it yet.  Those white plumey flowers mixed in is Gooseneck Losestrife {Lysimachia Clethorides}.  I used to have a ton of this flower all over.  It's terribly invasive, and I tore most of it out a few years back, but I let some of it grow here and there keeping a very vigilant eye on it to make sure it doesn't take over the garden again.


Just love the firey orange color of this plant.


Over by the shed, the Lavender I replanted from the herb garden is flourishing.  I even cut a bunch to bring in the house.  


The bumblebees were absolutely feasting on the flower's pollen while I was taking pics.  They were darting around so quickly, I couldn't get a good shot of them.


Below, Calibrachoa - Callie Orange, or Million Bells, is one of my favorite annuals.  They bloom and bloom without the need for much deadheading.  This discarded chair makes a cute plant stand on the little porch of the shed.  Mmmm, looks like the railing is need of a bit of fresh paint.  Add it to the list!


We don't have much shade any where around our yard.  The few trees we have are still growing and maturing. Our neighborhood was erected around 25 years ago in what was once a wheat field.  The only area I can work with in terms of shade loving plants is a little section on the north side of the deck that measures about 2 feet by 5 feet.


I have a couple varieties of Astilbe growing there.  As you can see, the pink is little past it's blooming prime.


The red Astilbe is still looking good.  I especially like this variety.  Mainly because red is my favorite color, and I like the darker, glossy leaves.


The little bed above is an area right behind the garage.  It gets shady there by about noon, or else I probably wouldn't be able to grow those Hostas as large as they are.  


This native, perennial sunflower called Helianthus hirsutus, seems to like this spot of partial shade.  I purchased this plant years and years ago at a fundraising native plant sale at a local nature center.  


It makes great, long-lasting cut flowers to bring inside.


The Morning Glories that self-seed here every year are beginning their ascent up the fence and trellis pole.  I planted seeds here many years ago, and have never had to plant again.  What a bargain!


By the end of the summer, this little piece of fence will be heavy with Morning Glory vines.


Next to that little fence, right by the back garage door, is the mate to the shed porch chair.  This one's been prepared to permanently house a plant by having a hole cut to accommodate a pot.


Another favorite annual, Sweet Potato vine.  I love this limey green color, especially mixed with purple Petunias - another favorite.  Let's see now, that's 3 favorites.  Can they all be my favorite, or do I have to pick just one?!


I wanted to share this annual I have potted up on the deck.  Doesn't it have the most beautiful flower?  I love that dark purple center, fuchsia petal with the lime green edge.  I didn't save the tag, so I'm not entirely sure what it is.  I think it's in the Calibrachoa {Million Bells} family.


Out in the vege garden, there are a few things blooming and some actual veges growing.  This plant is going to be a surprise.  Obviously it's a melon or gourd of some kind.  It most likely stared from seeds from the compost I added to the garden at the beginning of the season. 
There are two of them, and I'm going to let them go and see what I get!


Not exactly a bloom, but just as pretty, a few purple sweet bell peppers are just about ready to pick.


Another thing of beauty for me, teeny tiny tomatoes.  Around these parts, if you have ripe tomatoes by July 4th, you've earned bragging rights as an accomplished gardener! LOL


As you can see below, I always have to add a few flowers to my vege garden.  This year in an effort to keep the new pup, Xena, from traipsing through the garden, I've added a few barriers.


 One being that old, rusty, beat-up wheel barrow.  I just can't get myself to taking it to the curb.  I love junk in the garden, and this is about the junkiest thing I have!  I'm envisioning those flowers to completely fill in and be spilling out.


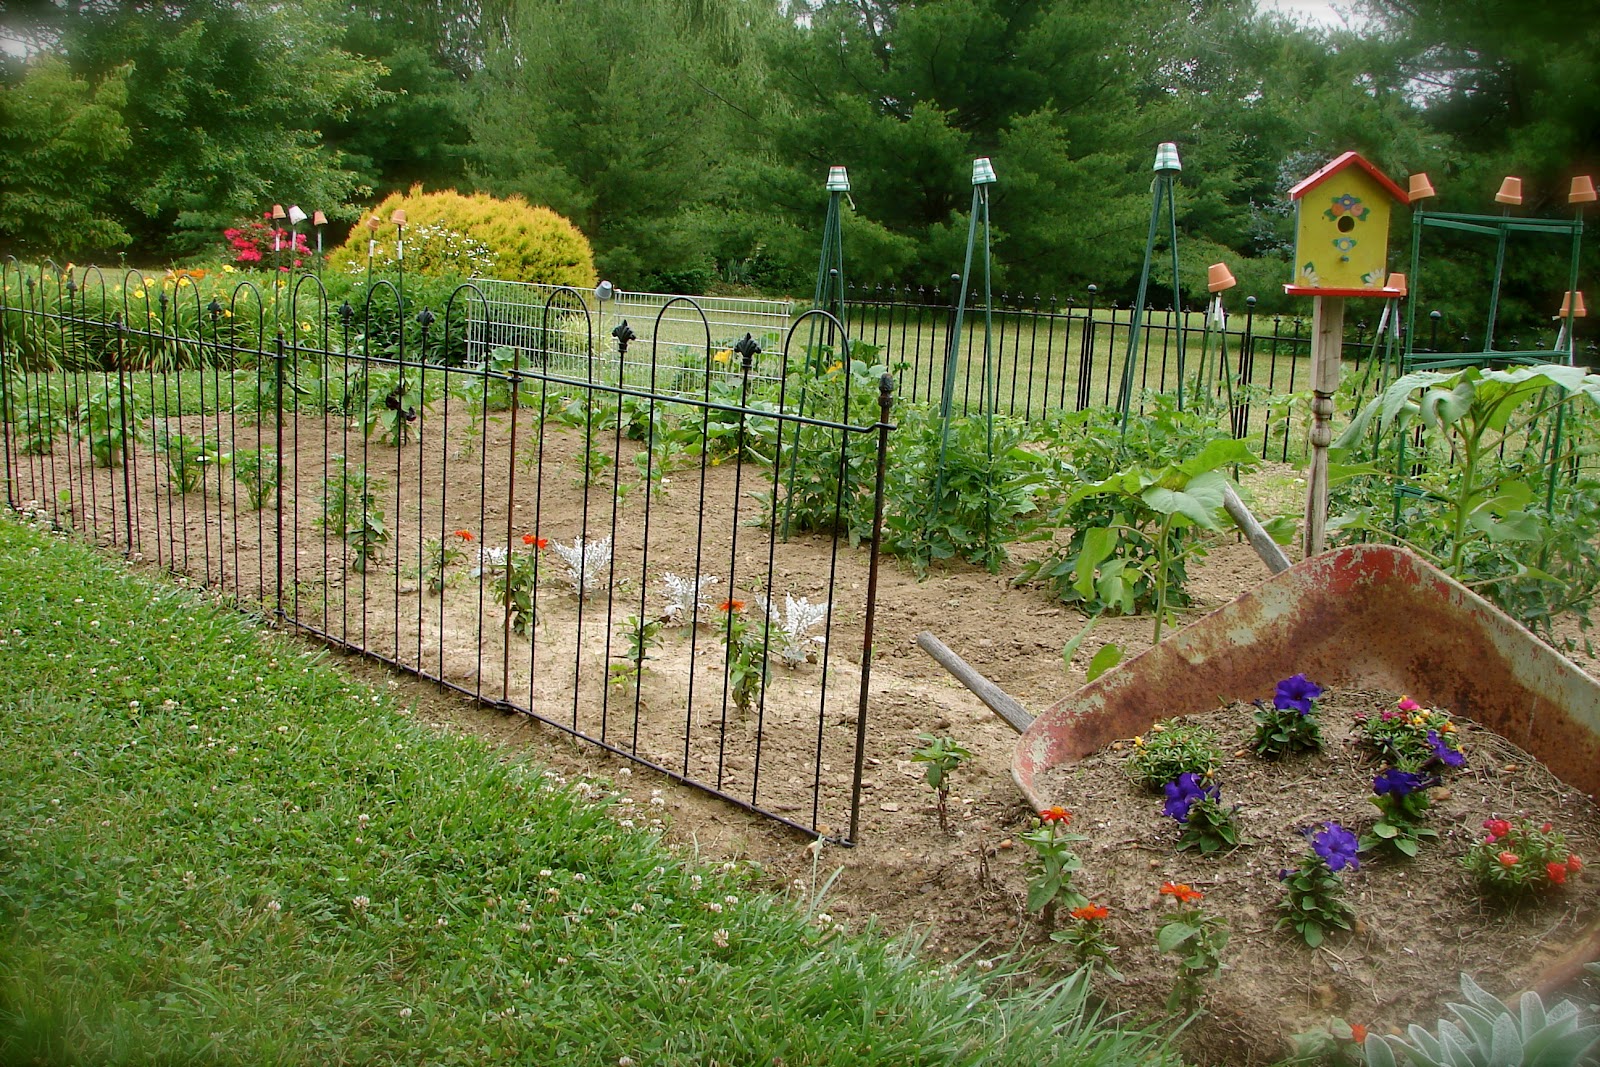
You can also see temporary fencing on both long sides of the garden to keep the dog out.  It seems to be working, and I like the way it looks too.

We have a a few near 100 degree days coming up later this week, so we'll have to see how the garden's fare during this upcoming little heat wave.  Guess I better start hydrating all these plants over the next day or two.

I'm linking up this week with 
Be sure to visit their great blogs, and the other gardens participating in their garden parties.


Thanks for visiting!
Leave a comment so I can get to know you.

Wednesday, June 13, 2012

THE Best Summer Cocktail

Are you looking for a light, refreshing cocktail mixture for your next outdoor gathering?  
Perhaps for your Father's Day Picnic or July 4th celebration cookout?


Well, if you've not heard or seen it, I have THE perfect one for you.

Raspberry Beer Cocktail
{aka "Skippy's"}

Southern Living Magazine
In my last post, I mentioned my niece's bridal shower was this past weekend, and I was in charge of the cocktails.  
Imagine that?!  The "CosmoGirl" in charge of cocktails!

Since it was an afternoon gathering, and a bridal shower, I didn't think my signature drink, Cosmopolitans, would be a good idea.

So, I started searching for refreshing summertime cocktails, and I found what I believe to be the best thing evaahhh!!!  Not only me, but all those ladies, and a few gents, at the shower agreed.  They sucked down this cocktail like it was the last bit of sustaining liquid on the planet.  
I actually quadrupled the recipe and we still ran out!

I decided to serve this amazing concoction in super-cute quilted crystal canning jars, that I will be able to use later in the season when I start canning goodies from the garden.  

They looked so adorable all line up on the lime-green tray just waiting to be grabbed up by the party goers.  I wished I'd taken more photos of the drink table, but you know how hectic it is setting up for a party . . .  especially a surprise party.  


I also made up a batch of Blue Margaritas in honor of my niece's "something blue" she's wearing on her wedding day ~ a fabulous pair of blue Manolo Blahnik shoes.  


The Blue Margaritas played second fiddle to the Raspberry Beer Cocktail, renamed "Rachel's Blushing Bride Cocktail" for the shower.  


I can't wait to whip a batch of these this weekend.  Maybe we'll have some for Father's Day.  Oh, and maybe a batch while relaxing on the deck Friday evening.  I bet a batch after a hard day's work in the yard on Saturday would be nice too. 
;o) 

You have to try this recipe.  
Even if you're not a beer drinker, I guarantee you and your guests will love it!


The Recipe

3/4 cup frozen raspberries
3-1/2 (12 oz) light beers*, chilled
1 (12 oz) frozen lemonade raspberry concentrate, thawed
1/2 cup vodka**
lemons and limes for garnish

*The reviewers of the recipe suggested using different light beers that all worked well ~ Corona Light, Bud Light Lime, even Miller Lite.  I choose to use Bud Light Lime hoping to get a bit more lime flavor going, and it worked great.

**I choose to use a citron (citrus flavored) vodka, and, again, it was great.  

I also could not find raspberry lemonade concentrate in my supermarket, so I used lemonade frozen concentrate and raspberry juice from the juice case.  I sliced lots of lemons and limes to place inside the drink dispenser with the frozen raspberries.  And in each mason jar glass, I added a couple fresh raspberries and thin slice of lime.


Thanks for visiting! 
Leave a comment so I can get to know you.

Monday, June 11, 2012

How to Make Your Own Cupcake Stand

I'm so excited to share this relatively quick and easy project with you.


 As a lover of cupcakes ~ baking and eating ;o) ~ I have always wanted a pretty way to display those luscious, tiny round cakes.  
I've had a couple inexpensive stands that just did not hold up.  And being the cheap thrifty person that I am, I could never bring myself to pay oogles of money for a really nice one.


Well, after perusing the net one day a while back, I stumbled upon this great stand handcrafted at 
Shanty 2 Chic's blog.  


Isn't it just gorgeous??!!!!  
Click here to read how Ashley created this beauty.

It became my inspiration.  
The only hurdle was not having any of the proper woodworking tools to make it.  
No worries!

I made a trip to Lowe's, bought an appropriately sized piece of maple plywood, and asked the nice lumber boy to cut it into the sized pieces I needed ~ 6, 10 and 14 inch squares.  Another trip down the furniture pieces aisle and I grabbed a few chair legs with screw plates. I'll explain the reason for the screw plates in a bit.  And lastly, I grabbed  a decorative finial for the top.  The only other supplies needed were a few cans of spray paint, and a trip to AC Moore Crafts for small unfinished wood candle holders for the feet.


After tallying up the cost of supplies purchased, I estimated the entire project to be around $30.  
Not too bad!


I wish I could say I crafted this all by myself, but Hubby did attach the screw plates to the bottoms of the top and middle tiers; although, I sooo could have done it all by myself.  You know . . . he's a dude . . . and there was a bit of power tool usage needed for the project . . . so . . . he had to get involved.

Now, the reason for the screw plates and chair legs is, as you may have guessed, so I can break it down for storage if needed.  Pretty smart, huh?!


The rest of the project was all me.  I sanded, primed, painted, distressed, antiqued, etc.  Speaking of antiquing, I used the vaseline technique to antique it.  


Again, refer to Shanty 2 Chic's blog for a tutorial on that method.  No sense reinventing the wheel here since they've done a great job explaining it on their blog.


It really was a very simple project.  Oh, I think I would have loved for it to be round, but not having the proper tools to make it round, I think it looks pretty okay being square.  Besides, everyone has a round cupcake tower, so mine is a little different :o)


And, when it's not displaying yummy cupcakes, I can use it as cute centerpiece, or in this case on my hutch decked it out with some beachy-inspired elements.


I was able to get this stand finished for my niece's bridal shower this past weekend.  She seemed a little disappointed that it wasn't hers to keep, so I think I'm going to have to whip one together for her.  


Thanks for visiting!
Leave a comment so I can get to know you.

Saturday, June 2, 2012

Upcycled Crib Spring

This is something I've wanted to do for a while now.  


Upcycle the crib springs from the crib all three of my boys used.  Along with so many of you I'm sure, I first saw this idea at Funky Junk Interiors.  


Funky Junk Interiors
I just love Donna's style and creativity with junk!

When I saw that post, I knew immediately I wanted to copy it.  Of course, Hubby thought I was nuts!
  
"What?! Crib springs on the wall?  I don't think so."


Well, I finally did it.  I have an area in the kitchen that's near the back hall that leads to the powder room, laundry and garage door.  It's kind of dead space that we've been talking about for years having a shallow custom shelving unit built there.  As you can see, still waiting on that.  


Anyway, I've had a variety of different things in this space and on the wall.  The last thing I had was a dry erase calendar and a small tack board with organizing slots and hooks for keys, etc.  


Well, it just wasn't really working.  I could never really get the calendar clean of the marker, the little tack board was never really used and only Son No. 1 would hang his keys on the hooks.


Down it all went one day, and up went the springs.  I thought about painting the springs, but for now I'm going to leave them as is.  And, I haven't done anything fancy on them like Donna from Funky Junk Interiors did, or all the others whose pics I've saved for inspiration.  

I was truly amazed at all the cool ways people have used these old crib springs.  I'm sharing my collection of inspiration pictures.  I wish I would have made note of exactly where I found these pics on the web.  I wasn't originally saving them to share, but for my own inspiration.  So, if any of the pics belong to you, or you know who they do belong to, please let me know so I can give credit.

Oh, and guess what, I think Hubby doesn't mind the springs too much now that it's on the wall.  As a matter of fact, he suggested I paint it antique white ;o)  


Junk Sophisticate 

Aren't they great ideas and uses for something that would be otherwise tossed into the landfill.  I think it's not only a useful way to reuse something that would be trashed, but it also adds detail and dimension to a wall, and it's a pretty cool conversation piece!


Thanks for visiting!
Leave a comment so I can get to know you.
Related Posts with Thumbnails